Blender Bender.

BlenderFor our entire game project the 3D modeling and animation package we have used is Blender. It was pretty much used to make the main character and all the mesh assets in the game excepting the world. We are using another software package for world creation and scene composition, but more on that later. I selected blender for variety of reasons. The most important is of course, it is free, but that was not the only reason for its selection. Don’t let the free thing fool you, blender is a mature piece software with features that can rival even the best 3D modelers out there. In fact some of the features like multires mesh modeling, UV unwrapping, multi UV unwrap and powerful animation system are are cutting edge and the very best.

The second most important reason why I selected blender is its amazing flexibility! OK, so if you have used blender then you might disagree with me. I said might, a veteran blender user might actually agree with me, but for some reason blender has got this nasty reputation of not having a very user friendly GUI. I tend to disagree with that view because it is biased. Yes blender has an unconventional interface that takes a little getting used to, but to say outright that it is bad just because of that, is judging a book by it’s cover. Anyways, that is an argument for other day.

As I said, I selected blender for its flexibility. Blender offers an amazing plug-in support. It supports a full Python plug-in system which is very easy to use. The plug-in system allows blender to be extended very very easily. In fact blender is fully written in Python and is open-source. That is an added bonus, it allows you to have a peek at the source if you want to or if you are stuck somewhere. I personally found blender to be very easy to extend via plug-ins. Python is one of my favorite languages because of its simplicity. No doubt my previous experience with Python also helped.

Since programming plug-ins for blender is easy, you can easily export blender assets into your custom formats. Blender already comes bundled with a lot of exporters and you can open the python code for one and have a look at it and maybe, modify one to suite your needs. However, to dabble with the code, you must have solid 3D graphics and 3D programming concepts. Blender offers very little help or documentation on its design, so you have to understand why certain things are the way they are.

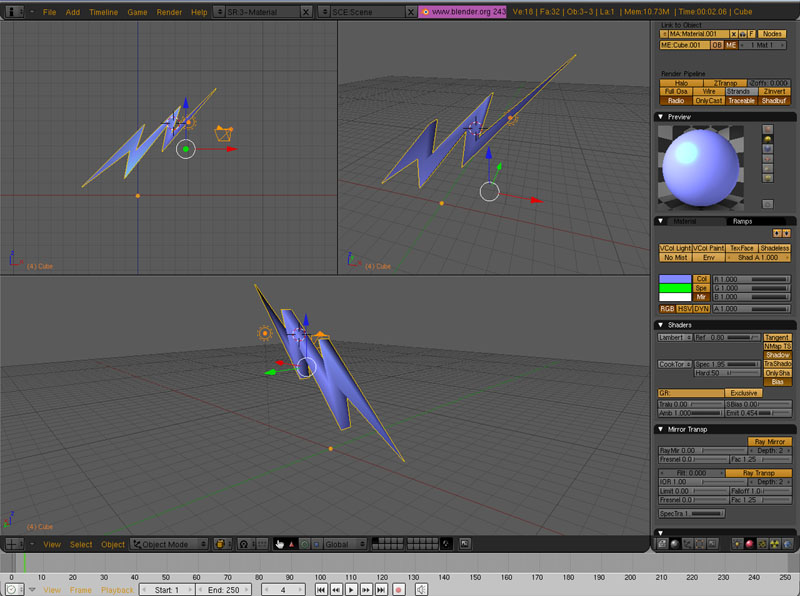
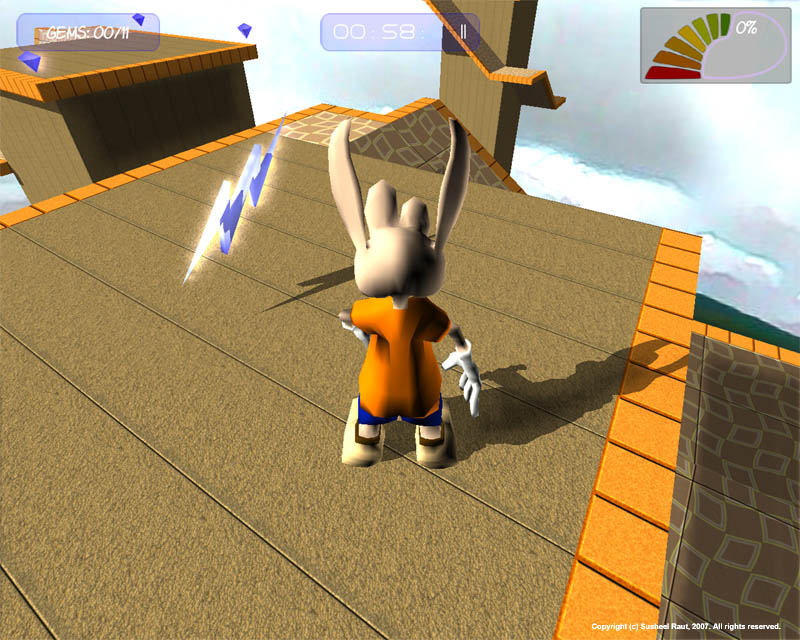
The other thing that helps a lot is the huge blender community support. Help is always at hand, people are willing to help out. That is not to say that blender documentation is bad, it is really good, though I must say the plug-in system docs are a little bit cryptic. But on the whole using blender to create game assets has been a win-win situation for me thus far. I have included some screens of art assets created in blender and then used in the game.

blender1.jpg

Gem asset in Blender

Blender screenshot

Power-up asset in Blender

Game using the same assets.

Assets in the game

For any blender noob (, that is not to say I consider myself a pro,) the best way to get started is the blender video tutorials. They guide you through properly and allow you get you hands set on the blender interface. After doing that it’s just a matter of following the blender documentation. That is all you actually need to get started with the software. Yes, it will take a great deal more to master it, but this should be enough to get any newbie started.

O2 Engine: Technology preview of lighting used in the Doofus game.

UPDATE: The O2 Engine has come a long way after this post. It is now is directly tied into content pipelines with modelers like Blender and is capable of achieving far better lighting than what is presented here. This post talks about lighting in a fixed function pipeline which is pretty old technology. The Doofus game is released and can be found at www.doofuslongears.com.

Some preview of the lighting technology used in the game. This is not an in-depth explanation of it, but is just a preview so don’t expect technical details here. Maybe sometime later, (I will fill in the details) or you can just ask and I will be glad to explain it.

The lighting in Doofus works on several levels, ie passes. The passes are then composited to give a final image. This technology is not revolutionary and I certainly haven’t invented anything new, but I have used in a clever way so that it can run even on old h/w without much difficulty. It also gives the scene a nice cartoon effect.

Basic lighting.

First the scene is rendered normally with the basic lighting of OpenGL or DirectX. The O2 engine abstracts over both APIs and can use any one. The results of basic lighting can be seen in this image. (Click on the images to see a larger version of that image.)

This type of lighting is pretty basic. The scene seems pretty bland and devoid of any real excitement. This lighting shown here is the default vertex based lighting given by the rendering APIs.

The real excitement comes to the scene when shadows get added to the scene. In case of the O2 engine and the Doofus game I am using Stencil Shadows. Stencil Shadows.Stencil shadows give hard crisp edges. That goes nicely with the cartoon theme of the game. In the next image you can see the shadows added to the scene. Along with shadows I have added a extra brightening pass i.e. Portions not in shadows are brightened up. That gives an illusion of soft sunlight (, the kinda sunlight you have very early in the morning).

Shadows add cohesion and drama to the scene. You can see a stark contrast between the two images, the one above without and the one on the right with shadow. The “drabness” of the scene is gone.

Lighting shadows plus a bloom filter.Things don’t end here. To have actual sunlit environments you have to have a super-bright component to the sunlight. Meaning, if you watch actual sunlight you will see that it is extremely bright with a halo like effect created at each shadow’s edge. For this, the engine does on more pass and applies a bloom filter to the scene to emulate sunlight.

The resulting scene looks actually sunlit, with the sunlight shining off bright surfaces. Watch the shadows boundaries closely, you will see what I mean. Now the scene looks correctly lit by sunlight.

Sun rendererFinally I want to show how the engine displays the sun. Observe the image on your right. You can see the sunlight bleeding through the edges of the roof just like an actual sun would when viewed across occluding geometry and notice the sun rays filtering through. The engine uses a similar variation of the multi render pass system explained earlier to achieve this effect. Just comes off looking great!

All images are actual game images captured while running the game in real-time. You can find more images of the game in the gallery section on my site.

Screen-shots are now reposted.

Sample screen-shotThe screen shots that had disappeared have now reappeared, i.e. I had to repost them on the site. The site is now at near 99% operational. Check out the screen-shots section for more images.

New website and new blog.

As you can guess from my earlier post, my old website was taken down rather mysteriously and I am not too happy about it. But there is nothing much I can do except mull over my loss. Anyways, things have to move on and so, this will be my new site from now on. There is one more change I have made, I am now blogging on wordpress instead of b2evolution. The switch is intentional, and I am already pretty happy about it. Most of my dev articles are still on the b2evolution database, which I plan to slowly by surely move to wordpress.

As far as the main site goes, it will be the cms site. There is no change to that. The site is not 100% up as yet. Some sections like the screen-shots are being worked on as I write this. But I don’t see any major problems over there. I am pretty happy with Joomla cms, so nothing changes on that front. I will continue a similar method of posting updates regarding game development (for those who have no clue, I am currently developing a 3D cartoon game called Doofus3D, and I blog all development) here as well as on the main page. I hope to finish migration of the site by tomorrow evening, since I am a little caught up in last week’s beta release.

Unlike the previous site however, I wont be having too many categories. I want to keep the ruckus to a minimum. Things like road-maps and progress will now on be under “Development” category. Anything specific about the O2 engine will come under “O2 Engine”. The one thing I miss however is the ability to categorize links. But I think I can always use my main site for that purpose. Joomla provides a much better links module and that should be the logical place where the links should be.

I just hope this site stays up longer than the previous. Keeping my fingers crossed.